Manually Importing Data
Who should use this guide?
This guide will help you with manually importing data into Tes Parents' Meetings. This may be necessary if:
- you don't have a school management system that we currently support, or
- you are using a hosted SIMS installation which your provider does not support, or
- we have advised you to use the manual import method.
If you use a hosted SIMS installation and the hosted provider does not support our SIMS Extract Tool, please instead follow the SIMS: Manually Importing Data guide which is similar to this guide but includes details on how to extract data from SIMS.
NOTES:
If none of those apply, manual importation can result in duplicated records - if you intend to go ahead anyway and have questions please contact us.
If you usually sync with an MIS to import your data, running a sync will override the manually imported data and this will be lost. If you have manually imported data and need to run a sync, or if losing data every time you run a sync will be an issue for you, please contact us.
To discuss manually importing your data, Please click on Contact Us in the bottom-right corner of the screen to reach our support team.
How to import your data
In the navigation bar on the left of your system, click Data:

This will load the Data Dashboard. Go to the section called Imports:

If you do not see this section you will need to turn on manual imports via Settings > Data Import Source > Allow Data to be Manually Imported.
When you click on the type of data you wish to import you will be asked to upload a spreadsheet (in .csv format) and will see a list of the columns it must contain. Make sure the spreadsheets being imported have a header row with these headings in it. Please also note that each cell per column has a 50 character limit, if any fields exceed this limit the import will not work.
NOTE: if there are new or updated Students and Teachers records then those imports must always be completed before any other imports. The Teacher and Student details must have matching MIS IDs to existing Teacher and Student records on the system.
If syncing your data via Wonde the MIS ID values may be from Wonde instead of your direct API. To find out the correct MIS IDs, navigate to data > students/parents/teachers and use the export function, the CSV file that downloads will contain an 'MIS ID' column with the correct values
Import Students:

The advised data fields are as follows, please see the example spreadsheet demonstrating this below:
- Student first name
- Student surname
- Year/Grade
- Registration Class
- Student MIS/SIS ID - this is a unique numerical identifier from your MIS. If your management system does not supply one, you can add a unique number per student
- Student date of birth, in DD/MM/YYYY format

Import Teachers:

Advised data fields and example spreadsheet:
- Teacher title
- Teacher first name
- Teacher surname
- Teacher MIS ID - as previous, this is a unique numerical identifier
- Teacher email
- Teacher department
- Teacher room

Teachers names may appear correct on the Teacher Data screen regardless of case sensitivity. However, if surnames are not formatted consistently, they may not sort correctly in other areas of the product, such as teacher availability and related screens. To avoid this, ensure all teacher surnames are formatted consistently, ideally with an uppercase first letter.
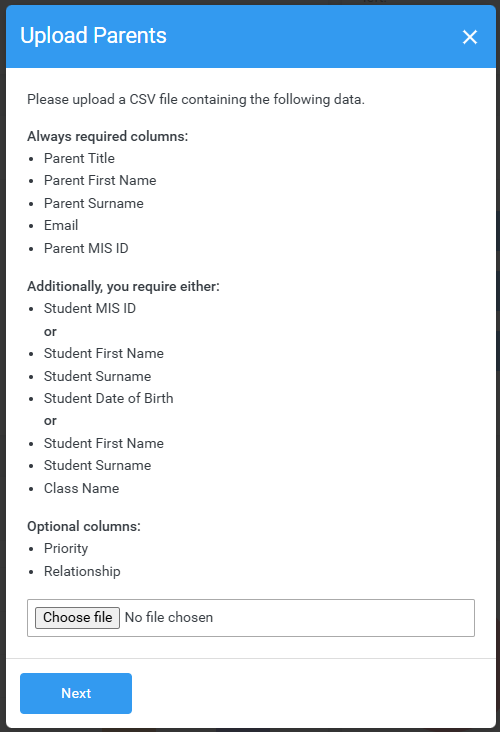
Import Parents:
This spreadsheet will have a line of data for every parent of every student, so if you have 100 students in the school each with 2 parents, you will have 200 lines of data. For example, a family with a mother, father, and 2 children will have 4 rows of data;
- Mother and child A
- Mother and child B
- Father and child A
- Father and child B
PLEASE NOTE: if you're importing a parent for a new student but the parent already exists on the system (e.g. a sibling of an existing student joining the school), you will need to include lines in your parent import for all children associated with the parent, not just the new student
Advised data fields and example spreadsheet:
- Parent title
- Parent first name
- Parent surname
- Parent MIS ID - as previous, a unique numerical identifier. This number is NOT the same as their respective student's, but unique to them alone as an individual record.
- Parent email - Required: Only way for parents to log in.
- Priority - this is the ranking of adults that are primarily responsible for the student, and may show on your MIS as 'Parent 1', 'Parent 2', etc
- Relationship
- Student first name
- Student surname
- Student MIS ID, student number or date of birth - the system will use the students' names and either their MIS ID, student number, or date of birth to create a relationship between the parent and student records in the system, and all data fields must match exactly

Import Classes:

This spreadsheet will have a line of data for every class of every student, so if you have 100 students each with 10 classes, you will have 1000 lines of data.
Please note that importing a classes spreadsheet will always replace existing class data within the system.
Advised data fields and example spreadsheet:
- Teacher first name
- Teacher surname
- Subject - the name of the subject
- Class code - any subdivision of a subject, for example if you have two year 8 classes for Science, these may be 8Sci-1 and 8Sci-2, or if you have separate English classes for years 8, 9, 10, etc, these may be 8Eng-1, 9Eng-1, 10Eng-1, etc. If you don't have subdivisions of a subject then you can replicate the 'Subject' column
- Class ID - a unique numerical identifier for each class
- Student first name
- Student surname
- Student MIS ID, student number, or date of birth - as previous, the system will use these fields alongside the students' names to assign them to the class, and all data fields must match exactly

Map Columns
Once you upload the files, the system will attempt to match the expected column to a column in the csv file you are uploading, please check that this is correct before clicking Next. If you title the columns in your import files to the expected column names, the mapping should line itself up by default.
As an example, here is Map Columns for the Students import:

Click Next and you will be presented with a summary of the changes (if any) being made along with any errors which may be present in the data being sent.
NOTE: A common cause of issues faced at this stage is students with accented or non-English characters. In order to support these during the import, you must change the file to be imported using the UTF-8 character set, In Excel, you can do this by opening the file and saving it as "CSV UTF-8 (Comma Delimited)". Other applications may have different steps so please check the relevant documentation for the application you're using.
NOTE: There isn't a way to set a 'main' teacher if you import a subject class with multiple teachers, all teachers will appear as a shared class so parents are able to book separate appointments with each teacher. Please see this guide for full info on how class teachers work: https://support.parentseveningsystem.co.uk/article/432-substituting-teachers-disabling-classes-and-managing-shared-classes
If you are adding or editing just a few teachers, students or parents then do not select Replace data on system with imported data as this will replace all your existing teachers, students or parents with the contents of the file.

Because the classes import always replaces all existing class data with the contents of the file, you will not see the Replace data on system with imported data option when importing classes.

Start the upload by clicking the I'm happy to proceed button and click Next. The data is then uploaded and confirmed.
Click Done to be returned to the Data Dashboard.

Repeat the process for any other data types you wish to import.